

Materials Used:

- Milani "Black Magic"
- Sinful Colors "Cream Pink"
- Sinful Colors "Glass Pink"
- Sinful Colors "Snow Me White"
- Seche Vite - Dry Fast Top Coat
- Dotting Tool (of you do not have a dotting tool, you can use a toothpick &/or a Q-tip with the cotton part cut off)
- Cotton round, cotton ball, or paper-towel to wipe off the dotting tool between colors.
- diamond's to accent the bows
Apply your base coat, and your base color. for this, i used SinfulColors' "Cream Pink"

Step 2
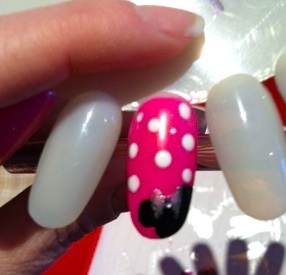
Using your larger dotting tool, create a circle that covers the bottom corner of the nail. You will want no less than 2/3 of the circle on the nail for the design to come out correctly.

Step 3
Now you will create two smaller circles on opposite sides of the top of the circle to create the ears. I used my large dotting tool for this.

Step 4
To create the bow, you will use your small dotting tool or a toothpick. you will create two triangles which touch at their points like i have done here (sorry for the poor image quality) I used
Sinful Colors "Glass Pink" for the bow.

Step 5
While the paint is still wet from the bow, you will want to apply the nail diamond to the center where the two triangles touch. If you do not have nail diamonds, you can use a piece of large glitter and it will give the same effect.

Step 6
Now it is time to create the large dots. For this, i used my large
dotting tool and Sinful Colors "Snow Me White". Again, if you do not
have a dotting tool, you can use a Q-tip with the cotton part cut off or
a toothpick. It is important not to add too many of the large dots or
the design will be too busy and you will want to leave room for the
smaller dots.
Step 7
Once you are happy with the placement of your large dots, it is time to
add the small dots. I like to wait till the large dots are dry before I
start this step (I'm notorious for smudging wet polish). I like to space my small dots out as evenly as possible. (my general rule of thumb is to place one small dot between each of the larger dots)

Step 8
Once your polish is dry, it's time for a top coat! I like to use Seche Vite Dry Fast Top Coat - it adds a super shiny top coat that makes my polish designs look like a gel finish - the fact that it dries super fast is a total bonus! 
Tail Wiggles and Puppy Kisses,
Ms. L.
Coco Bean Inspirations - ChiMafia
